
Totem Cam Review – Aid Climbing with Totems
Update 12/7/15 -
It has been four years since I wrote this review about Totem Cams. It is one of the first posts in my first blog and was the launch pad for thousands of pitches of climbing on El Capitan and around the world. Today, while editing "Dream Gear Lists" over at outdoorgearlab.com, I stumbled into the Totem Cam review. It got me thinking that I really should address a few of the key criticisms I occasionally hear about Totems, there really aren't many because at this point everyone who has used them, loves them, down to Alex Honnold (who even told me was tempted to buy a set, although I know he never did).
1 - Probably what I hear most is "Totems are bulky on your harness." This is sort of true, technically they are slightly bulkier than a Camalot, but there are two things to remember. First, who cares?! After you climb a few pitches and have adjusted to the change (nobody takes to change well), you won't ever notice that. Second, because Totems have a larger range, one set of 5 different size Totems (Blue, Yellow, Purple, Green, Red) is about like carrying the equivalent to 6 Camalots (0.3-#1). But seriously, who cares about the minor difference in 'bulk'.
2 - "They are heavier than Camalots" and "They have less range than Camalots" - Both of these are false. Check the tech specs.
3 - "The aren't durable". I have had one set for 4 years, they are still on my go-to rack for free climbing and aid climbing. Those cams have been up 35-40ish El Cap routes, countless free climbs, traveled around the world, and are still awesome.
4 - Sometimes people tell me that "they are hard to place". I really disagree here, they are different to place, but not hard to place. Like anything, they feel different than other cams on the market and you need to adjust to it, become familiar with them. Think of how many times you have placed the cams on your current rack, at least give these a dozen or so placements on each size to adjust.
5 - Another thing some people fear is that there are only 5 sizes (although soon to be 7, there will be a new smaller and larger size). I don't find this to be an issue. Having a uniform set of cams is nice, but really these cover the important sizes to have uniform and you can have uniform small cams of another brand if you want. And yes, for now, you have to carry a different brand large cams, big deal, those cams are hell to carry anyways. Personally I like to carry this rack on most (free) climbs:
6-8 small offset brass and aluminum nuts
1 each C3s to Red - these are my choice for finicky, funky, tiny micro placements
1 Blue Totem Basic Cam
1 Green Totem Basic Cam
2x Totem Cams (Blue, Yellow, Purple, Green, Red)
1 Gold Camalot
1 Blue Camalot
So, the bottom line with this update: Totem Cams (still) kick ass! These are a revolutionary new piece of equipment that is actually a new and different design for a camming unit. These are not just a recreation of the same SLCD "friend" concept that Ray Jardine invented, these are innovative and unique. I can't recommend these cams enough. Maybe the next time you need a new set, supplement a set of these into your rack and try them out, if you hate them, I promise, they will sell like hotcakes on ebay.
Now for the original review:
I heard about
a year ago when some friends saw them at Outdoor Research and said they looked cool. Over the winter I read an excellent
. Josh’s review was superb and sparked my interest in these cams. Josh talked a lot about free climbing with the cams but didn’t get into the details of aiding with them. I recommend browsing over the Pullharder review and Totem Cams website for an in-depth analysis of the technical specs behind these cams.
I am no machinist or engineer, what I hope to provide is a good look at how these function in the real world of climbing. So I got my hands on a set of Totem Cams and set out to use them for big wall climbing (and a bit of free climbing). I wanted to use and abuse these things, to test their ‘two lobe placements’ and see how they held up in flares like they say they will. I wanted to see how the intricate and complex design held up after being beaten on big walls.
So lets start at the beginning…

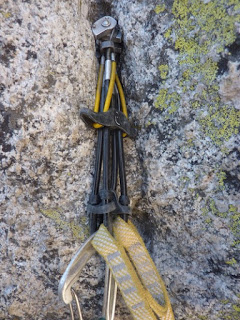
Out of the box you have to notice the feature that makes them so unique. Totem cams lack a stem giving them greater flexibility than any cam I have ever seen. They are lightweight, and while a little bit bulkier than other cams, it has not bothered me at all when they hang from my harness.


Totem’s claim is that these can maintain holding power in 40 degree downward flare and that they can be used in 2 lobe placements (when clipping a single thumb loop).
Flares? Oh yeah, they hold.
My plan was to really try to utilize these as much as possible for all of that aiding trickery that is required Yosemite Valley on walls. I hoped to use the Totems in placements where I would normally reach for an Alien or offset Alien in pin scars and blown out placements.
I was eager to get these things out to the stone, especially for aiding, so off to El Capitan I went. I substituted both a red and yellow Alien for a blue and yellow Totem Cam. I also substituted a purple, green and red Camalot for their corresponding size Totems. Over the course of several months I took them up The Shortest Straw, Native Son, Mescalito, and The Nose. As well as dozens of pitches of free climbing over the next several months.
After the first few pitches of The Shortest Straw I really noticed how solid the Totem cams feel when placed in normal placements (places where you aren’t having to put much thought into how to make the piece stick). They have a stability that I haven't noticed with any other cam. Because of their unique lobe design and the way the cams are loaded onto the lobes (via the clip-in wires as opposed to the axle), the Totem Cams seem to cam with more force than other cams on the market.
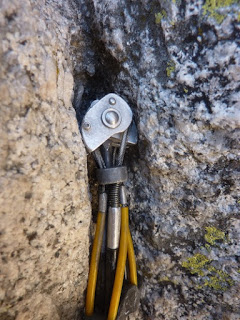
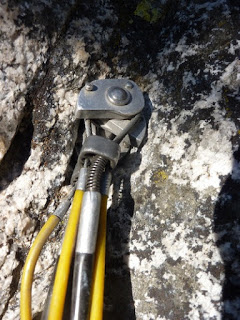
The orientation of the wires on the lobes seems to create a lever, similar to a tricam in some ways, providing more force and a stronger camming feel. This proved to be an awesome quality while aid climbing, allowing the cams to stay in places I didn’t think they would, like pods, and flares. I was able to turn horrible, blown out pin scars into decent placements. Many of these placements were far more solid than they look.
Two lobes or is that three?

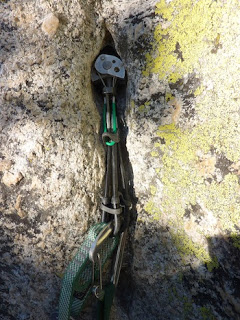
Learning the trickery
Barely in there, yet I could jump on the aider
Over the three days on the route I became more and more comfortable with the Totem Cam. I admit, I had to learn how to use this new tool, the more I used them, the more comfortable I became with them and the more I figured out what they could do.
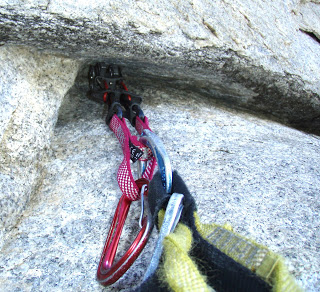
One of the aspects of Totem Cams that I was originally most interested in is the ability to clip a single set of cam lobes, essentially creating a two-lobed cam. At first I was nervous to use this feature, it was so unlike anything I had done before. However, I quickly learned how useful this is. A few examples:
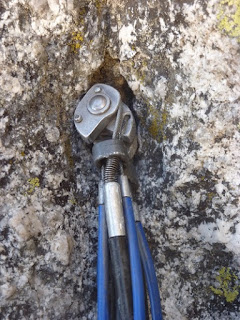
Clipping just the inside lobes can be essential
I couldn't make anything stick in this 3/4 inch deep sawed angle scar except this Totem, and it was bomber.
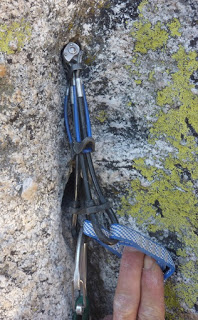
One of the best tricks I have learned with the Totem cams is how you can clip through both of the thumb loops, orienting the biner of your aider through the inside lobe set first, then through the outside lobe set.
This has the effect of applying more force to the inside lobes (the set that you almost always want to pull harder on, as they are deeper in the rock and gain more purchase). The outside lobes are also weighted but see less force. This is an incredible trick in shallow flares and pin scars where the outside lobes of the cams are far more open than the inside lobes. Below are several placements clipped like this.

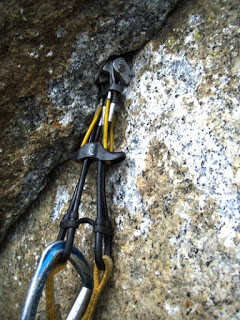
Weird pin scars, no prob.
Several times I placed cams and clipped them like this thinking there was no way it would hold, and found myself jumping on the aiders in amazement while the cam didn’t budge.
Issues:
I have now taken totem cams on 4 El Cap routes, nearly 100 pitches, and double that of free climbing pitches. I worried that the metal of the lobes (I would compare it to Alien lobes) was going to wear, dent, ding, and mushroom easily. This has not been the case at all. The cams still look and perform perfectly. I had one issue with a trigger spring on the largest cam (red) popping through the trigger plate. With a bit of pulling and tugging I was able to pull it back through and it works fine.
One of my climbing partners has remarked that he wishes the smallest two cams were different colors, as they do not correspond with Black Diamond or CCH aliens. However, within a few pitches I think you get used to it.
Overall:
Totem Cams have designed a new and innovative piece of protection. This is a new tool in my arsenal of big wall climbing equipment. While I wouldn’t say that Totems replace Aliens/Mastercams and their offset counterparts, they are great for big wall climbing. Totems will go with me on all of my big walls from here on, they have been with me on some of the hardest pitches I have lead and I have been extremely happy to have them.
The complex design is very well made and seems to be holding up as well (or better) than any other cam I have owned and used on the wall. I can't wait to see the basic cams and the offsets.
The way that one lobe set can be clipped and some of the tricks open new doors for clean climbing on big walls as well. While I am not one to preach clean climbing, it is a fact that better rock preservation means more people enjoying routes for longer (myself included).
Overall, I would highly recommend Totem cams for both free climbing, and especially, for aid climbing. I need to thank Totem Cams for donating this set for a review. I informed them I wanted to write an unbiased review and I tried to portray my experiences with the Cams honestly and truthfully. I hope the climbing and big wall community find this review helpful. Let me know if you have any other questions.